Latest News
Share this post:
Taking pictures of animals in the outdoors can be an exciting way to experience nature, but it can also be challenging to get really great shots. To capture beautiful images of animals, it first helps to have an understanding of fundamental photography concepts. Once you understand the fundamentals, there are several things you can do to improve your chances of getting that great wildlife shot.
Here’s are 10 tips for taking better wildlife photos:
1. Choose a Fast Shutter Speed
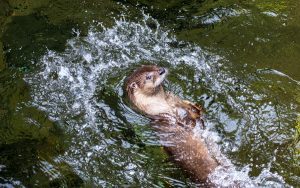
This image of a river otter splashing in the water was taken with a shutter speed of 1/640th of a second.
Generally speaking, you’ll want a fast shutter speed to freeze the motion of moving animals. Try 1/250, 1/500 or even faster.
Exactly how fast you need your shutter speed to be depends a lot on the type of animal you’re taking pictures of, the level of activity, and the length of your lens. For animals sitting still, you can shoot with relatively slow shutters speeds, perhaps even as low as 1/100th of a second, but for animals on the go, you’ll probably want to use 1/500th of a second or faster. For running animals, start with a shutter speed around 1/1000th of a second and for flying birds you will likely need to use 1/1250th of a second or faster.
If you’re shooting in aperture priority mode, as many wildlife photographers do, you’ll select your shutter speed by increasing or decreasing the aperture. For instance, if you want a faster shutter, you will select a smaller f-stop number and vice versa.
If you’re using a camera that doesn’t allow you to manually adjust the aperture or shutter speed, look for different auto scenes. Putting your camera in the sports scene will tell the camera to prioritise a fast shutter speed to freeze motion.
You’ll also want to keep in mind the relationship between shutter speed and the size of the lens that you’re using. The rule of thumb for figuring out the lowest handheld shutter speed that will produce a sharp image is to look at your lens focal length and have the shutter speed match the reciprocal of that number. For example, if you have a 250mm lens, you want to shoot at 1/250th of a second or faster while handholding the camera. If you need a slower shutter speed, use a tripod or monopod to steady the camera.
2. Put Your Camera in Aperture Priority Mode

This image of a peacock was shot with an aperture setting of f/4 and a shutter speed of 1/500th of a second.
Though it may seem counterintuitive, many wildlife photographers choose to shoot in aperture priority mode (you manually select the aperture and let the camera determine the shutter speed) because it makes getting a properly exposed image of moving animals easier while still allowing for a lot of manual control.
Aperture priority is often preferred over using shutter speed priority mode (you manually select the shutter speed and let the camera determine aperture), because sometimes shutter speed priority can result in an over- or underexposed image. For example, if you select a fast shutter speed to freeze the motion of a moving animal, the camera may butt up against the lower limit of the aperture range and not be able to achieve a proper exposure.
To capture a moving subject using aperture priority mode, you would select a small f-stop number to let in more light. This will force your camera to choose a fast shutter speed to achieve the proper exposure, but it will limit the shutter speed to one that will provide the proper exposure. If you require a faster shutter speed than you can achieve by adjusting the aperture, then you can always bump up your ISO by a stop or two.
3. Choose a Mid-Range ISO
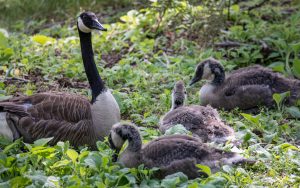
This image of a goose with her goslings was taken with an ISO of 800.
A good rule of thumb for wildlife photography is to set the ISO in the mid-range, somewhere around 400 – 800. In many lighting situations, this will allow you to shoot with a fast enough shutter speed to freeze the motion of moving animals. If you need an even faster shutter speed to get the shot, you can bump up the ISO even higher.
If you don’t want to worry about setting ISO so you can focus on choosing the right shutter speed and aperture for your shot, you can use auto ISO. Some cameras even allow you to set a maximum ISO while using auto, so you let the camera determine the ISO but know that it won’t go above a certain point.
4. Use a Long Lens
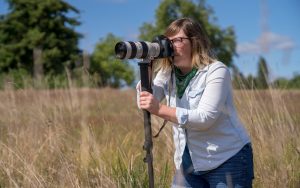
Using a large lens allows you to snap photos from far away but get results that look as if you were only a few feet from the animal. For most wildlife photographers, a lens with 200 – 400mm focal length will be sufficient. This can either be a lens with a fixed focal length or a zoom lens. Zoom lenses are popular because they give you the flexibility of changing the focal length; for example, you can take pictures of something only a few feet from you and then quickly zoom in on an animal that’s 50 feet away.
You may want to turn on image stabilisation (IS) to help eliminate blurs from any unsteadiness you might have during your shots, particularly in low light or slow shutter-speed situations. Many long lenses have two IS modes: one for stabilising both vertical and horizontal and one for just vertical, which still allows you to pan side-to-side. If you’re using a tripod, keep image stabilisation off.
Consider a teleconverter: Lenses can get quite expensive, especially when they combine really large focal lengths (some can be as high as 800mm), very low apertures to let in more light and image stabilisation to reduce camera shake. A more cost-effective way of increasing your reach is to add a teleconverter to a lens you already have.
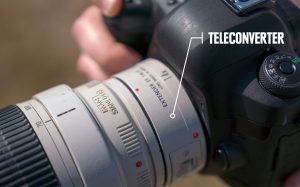
A teleconverter works a lot like a magnifying glass to increase the focal length of an existing lens. Teleconverters install between the camera body and lens and will increase the focal length by the factor listed on the teleconverter. It’s worth knowing that teleconverters reduce the available apertures by at least one stop (so if your lens normally goes as low as f/4, you’ll only be able to shoot at f/5.6 or higher while using a teleconverter).
5. Use Autofocus
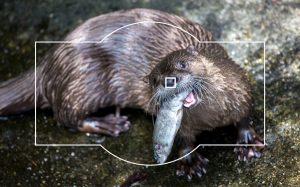
Manually focusing on a moving animal can be quite difficult. Do yourself a favour and switch to autofocus to get a sharp image. Many cameras have a couple different focus settings that can be helpful when taking pictures of wildlife:
-
-
-
-
- Choose a single focus point: This is when the focus uses a single point rather than multiple ones to determine what to focus on when you press the shutter halfway down. This is a good choice when taking pictures of animals because it allows you to aim the single point at the animal to ensure that the camera focuses there and nowhere else. The single focus point can be set to the centre of the frame or any other point. Choosing a focus point that’s not in the centre may be helpful when composing an image, such as when the subject is off to one side.
- Use continuous focus mode: In this mode, your camera will continue to focus if the shutter is pressed halfway down. This is a good option when you’re taking pictures of animals that are moving quickly. With most cameras, you can use continuous focus mode while also using single focus point, giving the option of continuously focusing on a single point.
-
-
-
To check your focus as you go, use your LCD screen to review your image after you shoot it. You can zoom in on areas where you want the focus to be super sharp. If the zoomed-in area seems out of focus, take another shot.

6. Use a Sturdy Tripod or Monopod

Because you’ll likely be using a large lens while photographing wildlife, you may need a tripod or monopod to help you steady the camera and lens. Monopods are a nice option because they are lighter and more compact than tripods, though they don’t keep the camera and lens as stable as a tripod. If you don’t have a tripod or monopod, you can try stabilising your camera by resting the lens on something, like a rock or your backpack.
7. Be Patient and Prepared
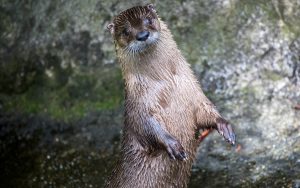
You might get lucky once in a while and have your camera ready when you happen upon a beautiful animal striking a pose. But, more often, you’re going to need to wait for something special to happen. Having patience is essential to taking great photos of wildlife.
It’s also important to be prepared to capture the shot when something special does happen. To be ready, you need to:
Know your camera
Whether you’re using a point-and-shoot camera, a smartphone or a DSLR, you need to know how to use your equipment before you get out there. Spend some time at home exploring the functions on your camera. Know how to adjust things like shutter speed, aperture and ISO.
If your camera doesn’t allow you to adjust these, look for a pre-programmed scenes that you can use. Often times, the sports scene will adjust the shutter speed and aperture appropriately for taking pictures of fast-moving subjects. Learn more about how cameras work.
Know your subject
Whether you want to take pictures of big mammals or tiny insects, it can be helpful to spend time researching the wildlife common to the area. Knowing what time of day the animal is most active and where it is typically found can increase your chances of seeing the creature and getting a good shot. The internet is a good resource but so are field guides for the region you’re exploring.
If at the end of the day, despite waiting patiently and being prepared, you go home without the image you were hoping for, don’t view your time out there as a waste. While taking time to observe wildlife, you’ll start to pick up on animal habits, personalities and patterns. You’ll figure out when the animals are most active, the paths they like to travel and the unique behaviour that will make a good photo. The next time you head out, you’ll be better equipped to get the shot.
8. Compose a Good Photo
Using the rule of thirds, eliminating distractions and zooming in and out are three ways to compose good wildlife photos.Here are some composition tips to keep in mind when taking pictures of wildlife:
Use the rule of thirds

The rule of thirds is a basic compositional technique and an easy way to improve your photos. To use it, break up your image into thirds vertically and horizontally with imaginary gridlines and position the subject(s) of your photo either along the lines or at the intersection of two lines. This will create a more balanced and visually interesting picture. To make this really easy, many cameras allow you to display a grid in the viewfinder and/or on the LCD screen so you can quickly compose images with the rule of thirds in mind. For example, rather than composing a photo so that an animal is right in the middle of the image, try taking the picture with the animal off to one side or toward the top or bottom.
Eliminate distractions
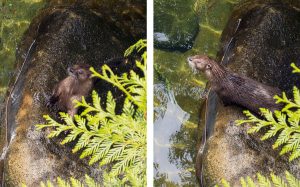
Be aware of distracting elements in your image that will detract from the quality. Things like sticks that partially obscure a bird or jut out from behind the body of an animal can be distracting to the eye. Sometimes you’ll have to be patient and wait for the animal to get in just the right position, but you can also try to zoom in tight to cut out distractions in the background. If you don’t have time to do this while you’re out there, you can always crop things out when you’re editing your photos later.
Zoom in, zoom out
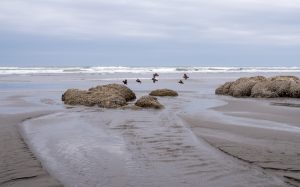
It’s easy to get fixated on only taking closeups of animals. This is natural, as we usually want to see animals’ faces to get a sense of their personalities. But, sometimes it’s worthwhile to zoom out (or switch to a wider-angle lens) to reveal the environment where the animals live. This can also tell a lot about an animal and make a beautiful image. Pairing a closeup alongside a zoomed-out image can be a great technique to use when displaying your images in an album.
9. Keep Shooting
You never know exactly when an animal is going to do something picture-worthy, so you have to be ready to capture the shot quickly. Taking short bursts of images can help increase your chances.
Many cameras have a setting that will help you do this. Look for something called continuous shooting mode or burst mode. When this setting is on, you can take several photos in quick succession by pressing the shutter or holding it down. Firing off photos like this can help you capture the ideal shot of an animal on the go. Keep in mind that it’s really easy to take a lot of photos this way so make sure you have enough space on your memory card or carry extras.
10. Leave No Trace: Respect Wildlife
It can be tempting to do whatever it takes to get the perfect shot of an animal outdoors, but it’s important to always follow best practices for traveling in natural spaces and be mindful of how your presence impacts wildlife. One of the seven Leave No Trace principles is to respect wildlife. This principle encompasses the following:
-
-
-
-
- Observe wildlife from a distance. Do not follow or approach them.
- Never feed animals. Feeding wildlife damages their health, alters natural behaviours, and exposes them to predators and other dangers.
- Protect wildlife and your food by storing rations and trash securely.
- Control pets at all times, or leave them at home.
- Avoid wildlife during sensitive times: mating, nesting, raising young or winter.
-
-
-
Always keep these points in mind while photographing wildlife.

 Collecting and Propagating Seeds
 China on a Plate: The Flavours of a Nation (with a Spotlight on Sichuan)
 Kinesiology Cross Patches
 Camaraderie On a Walking Tour…
 How E-Biking Has Transformed Biking Tours
