Latest News
Share this post:
You can be standing in front of the most picturesque mountain vista with your camera ready and all the technical know-how to use it, but without an understanding of photo composition, your images may not completely capture the magnificence of the scene.
Photo composition refers to the way visual elements are arranged in an image. Photographers who consistently take great outdoor photos typically use one or more of a handful of compositional techniques. By learning and using these techniques, you can see dramatic improvements in your shots. (Keep in mind that it’s usually best to use only one or two techniques in a single image; introducing too many can sometimes be overpowering.)
Photo Composition Techniques
-
-
-
-
- The rule of thirds: Break your image up into thirds vertically and horizontally and place the subject of your photo at the intersection of two lines or along the lines.
- Depth of field: Shooting with a large aperture (low f-stop number) creates shallow depth of field, which you can use to blur the foreground and/or background of the image. Using a small aperture (high f-stop number) creates a deep depth of field so that most, if not all, of the image will be in focus.
- Frame your subject: Take your picture so that things like trees, tall grass or flowers frame your subject and draw attention to main points of interest.
- Leading lines and implied lines: Use lines to guide the viewer’s eyes through your image and to the subject. These can be actual lines formed by, say, trees and trails, or they can be implied by the way the subject(s) are arranged in the photo.
- Change your point of view: Shoot from up high, down low, or from the hip to get a more interesting angle on your subject.
- Use the foreground, middle ground and background: Include interesting elements in these three areas of your image to bring depth to your photo.
- Eliminate distractions: Sometimes a person in the background of your image or an oddly placed tree branch will detract from the quality of your image. Simply changing your position is sometimes enough to eliminate distractions from your shot, but you can also try blurring them with a shallow depth of field.
-
-
-
1. How to Use The Rule of Thirds
The rule of thirds is one of the most basic compositional techniques in photography and is an easy way to boost the quality of your images. To use it, you simply need to mentally break up your image into thirds vertically and horizontally with gridlines and position the subject(s) of your photo either along the lines or at the intersection of two lines. This will create a more balanced and visually interesting picture. To make this really easy, many cameras allow you to display a grid in the viewfinder and/or on the LCD screen so you can quickly compose images with the rule of thirds in mind.

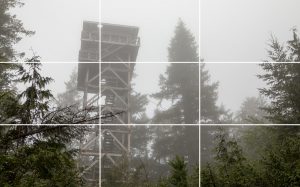
The fire lookout is placed along the left gridline with the main part of the lookout at the intersection of two lines.
Here are a couple examples of how you might use the rule of thirds:
When composing a landscape photo, rather than positioning the horizon so that it cuts across the middle of the image, try taking the picture with the horizon at the bottom or top third to create more visual interest.

Or, if you’re taking a portrait picture, play around with positioning the subject where two lines intersect. In the image below, the subject’s head is where the left third and top third of the image meet.

2. How to Use Depth of Field
Depth of field is essentially the zone within a picture that appears in focus. You can control depth of field, and therefore how much of the image appears in focus, by changing the aperture settings on your camera. With a larger aperture (lower f-stop number), more light is let in and a shallower depth of field is created, which means only some elements in your photo will be in focus. A smaller aperture (higher f-stop number) lets in less light and creates a deeper depth of field so more of the photo is in focus.
Using depth of field is a common technique in photo composition, and how you use it largely depends on what creative effect you want to achieve. For instance, if you’re taking a picture of a scene with a fence that angles away from you, you can use a larger aperture (low f-stop number, such as f/2.8) for a shallow depth of field to blur the background and draw all of the attention to the part of the fence you want in focus.

On the flip side, if you’re taking a picture of a landscape, you might prefer to have everything in the foreground and background sharply in focus so you’d want to use a smaller aperture (higher f-stop number, such as f/16).

3. How to Frame Your Subject
Framing is a compositional technique where you include things in your image that create a frame around your subject to add emphasis. For example, when you’re taking a picture, you can include trees, clouds or flowers on the edges of the image. Get creative and look for natural ways to frame your subject while you’re outdoors.

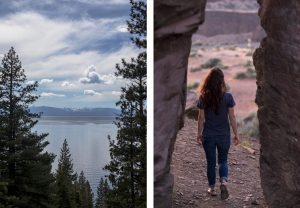
In the image on the left, the trees frame the water, mountains and clouds. In the image on the right, the rocks frame the woman.
4. How to Use Lines in Your Photos
Carefully composing lines in your pictures is a powerful way of giving your images a certain feel and of drawing the viewer’s attention to a specific area. Once you start looking for lines, you’ll see them just about everywhere. Sometimes they will be obvious, like the lines created by a trail that leads through the forest; some will be more subtle, like a cloud that cuts across the sky. There are many different ways to use lines in your images and there’s no one right answer, but here are a couple techniques to try:
-
-
-
-
- Use leading lines: Leading lines are visible lines that guide your eye through the image to the main point of interest. They can add a great sense of movement to an image that otherwise may feel flat. For example, you can creatively use trees in a forest, a field of tall grass, wispy clouds or a winding trail to lead the viewer’s eye through the image to the subject.
-
-
-

Trees make good leading lines, guiding your eye through the image.
-
-
-
-
- Look for implied lines: Sometimes lines are implied, meaning there isn’t a literal line but that objects in the photo are placed in such a way that the viewer’s eyes create a line. For example, a photo of a hiker gazing off to the side of a photo has an implied line originating at the subject’s eyes and running in the direction they’re looking. Another example could be a group of rocks arranged in a way so that the viewer connects them into a line like a dot-to-dot image.
-
-
-

The boulders create an implied line that starts at the lower left and runs toward the centre of the image.
5. How to Change Your Point of View
It’s all too easy to get in the habit of standing and snapping pictures only from head height. Of course, you can take great photos this way, but sometimes you’ll find that mixing things up will add a spark to your images. When you’re out shooting, try changing your viewpoint by taking photos from a bird’s-eye view or get down on the ground to capture a worm’s-eye view. You can even shoot from the hip and see what you get.

You can also vary the distance from which you shoot your subject. Try getting really close, as close as your camera will allow while still being able to focus, and see if you like the results.

6. How to Use Foreground, Middle ground and Background
When you’re out taking photos, you’re essentially trying to capture a 3D world in a 2D medium, which can sometimes fall flat. So, when composing your photos, look for ways to add depth. You can do this by including interesting elements in the foreground, middle ground and/or background. For example, if you’re taking a landscape picture of a beautiful mountainous horizon, rather than only including the horizon line in the photo, try incorporating something interesting in the foreground and/or middle ground to draw the viewer’s eye through the image. This could be a person, a group of trees, some rocks or a beautiful lake.

7. Eliminate Distractions
Sometimes taking a good photo is more about what you don’t include in the image than what you do. Distracting elements, like an oddly placed person or tree branch, can dramatically change the feel of a photo, so it’s a good idea to glance around through the viewfinder and take note of things that might detract from your picture.
To eliminate distractions, don’t hesitate to move around and find a way to take your picture so the distractions aren’t in the shot; sometimes all you need to do is take a few steps one way or the other to eliminate them. But, if that’s not possible, try blurring the background by shooting with a low aperture to create a shallow depth of field. And, keep in mind that there’s no definitive rule on what’s distracting; In fact, what one photographer finds distracting, another might find fascinating.

Experiment
With digital cameras, you don’t have to worry about whether you have enough film to shoot your subject. With enough battery power and memory space, you can take an endless number of photos, so go ahead and play around with different compositional techniques and don’t hesitate to break the rules once in a while.


 Collecting and Propagating Seeds
 China on a Plate: The Flavours of a Nation (with a Spotlight on Sichuan)
 Kinesiology Cross Patches
 Camaraderie On a Walking Tour…
 How E-Biking Has Transformed Biking Tours


