Latest News
Share this post:
Taking pictures of landscapes may seem simple when you’re surrounded by so much natural beauty in the outdoors. But to really take a great photo, one that you want to share with friends or hang on your wall, there’s more to it than just pulling out your camera and snapping a few pics.
Once you have your fundamental photography concepts down, there are several things you can do to improve your chances of getting a share-worthy landscape shot. Here are seven tips to help you with your landscape photography.
1. Select a Mid-Range Aperture
One of the goals when taking landscape pictures is to get an exceptionally sharp, clear image. The exposure settings that you choose have an effect on this, starting with aperture. To get the sharpest, clearest image possible, it’s best to shoot with an f-stop number that’s about two to three stops higher than the lowest possible (a mid-range aperture, like f/8 usually works well). Using an aperture too far toward either end of the spectrum, such as f/2.8 or f/22, can cause a subtle reduction in clarity.

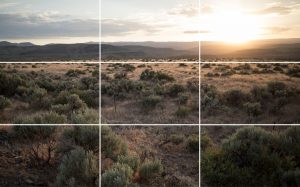
This image was shot with an aperture setting of f/8.
However, if your landscape photo includes visual elements in the foreground, mid ground and background, then you might want to play with the aperture to achieve a certain creative effect. For instance, to create a high depth of field where elements in the foreground and background are in focus, you’ll want to use a high aperture, something like f/11 or f/16. Or, if you intentionally want to blur something in the foreground of the image, you can set your aperture low, such as f/2.8, for a shallow depth of field.

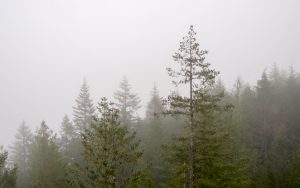
This was shot with an aperture setting of f/3.2 creating a shallow depth of field.
2. Choose a Low ISO
Another way to ensure the best image quality is to set the ISO as low as you can while still being able to shoot with the aperture and shutter speed that meet your needs. This will help keep the image from getting grainy, which can happen with higher ISO settings. An ISO in the 100 – 400 range usually works well for this. However, keep in mind that you don’t want to miss your shot because you’re determined to shoot with a low ISO in order to maintain image quality. If you need to raise the ISO so you can use a certain aperture and/or shutter speed, then do so.
3. Use a Tripod if You Need One
With your ISO and aperture set, choosing a shutter speed can be as simple as selecting whatever shutter speed will give you a proper exposure. To make this really easy, put your camera in aperture priority mode when selecting the aperture and your camera will automatically choose the shutter speed that will work best for a proper exposure. However, if your shutter speed gets too low you may need a tripod to prevent blurring caused by the shake of your hands. The general rule of thumb for determining the lowest usable handheld shutter speed is to look at your lens focal length and use a tripod for any shutter speeds slower than the reciprocal of that number. For example, if your lens has a focal length of 50mm, you may be able to shoot at 1/50 of a second without getting handshake blurring, but you’ll want to use a tripod for speeds slower than that.
4. Shoot During the Golden Hour

Photographers refer to the time periods just after sunrise or before sunset as the golden hour (also sometimes called magic hour) because of the beautiful, diffused light that is created by the sun being low in the sky. To really get a stunning landscape photo, go out during these times and take lots of pictures. With the sun low on the horizon, the scene will take on a warm glow and you might be able to capture long shadows that will add depth and interest to your images.
Of course, that doesn’t mean you can’t take landscape pictures during other times of the day. If it’s the middle of the day and the sun is high in the sky, you’ll likely have harsh, glaring light that won’t often make for the most attractive picture. In these conditions, look for ways to soften the light. If there are clouds in the sky, try waiting for one to cover the sun so the light will be a bit softer. You can also try positioning yourself under a tree or perhaps you turn your attention away from the vast landscape and try snapping photos of objects closer in, like the leaves on the trees.
5. Use a Polarising Filter
Using a polarising filter is something many landscape photographers do to enhance colour and contrast and reduce glare in their images. Polarising filters can be particularly useful when shooting scenes that include water, sky, rich colours and lots of reflections. For example, with a polarising filter, you can really bring out the vibrant blue of the sky or reduce the shiny glare of water on rocks.
Most polarising filters screw onto the end of the camera lens and can be rotated by hand to control the amount of the polarising. An added bonus is that the filter protects the glass of your lens from scratches and other damage.
If you’re using a point-and-shoot camera or a smartphone, you likely won’t be able to attach a polarising filter. One thing you can try is holding up a pair of polarised sunglasses in front of your lens to achieve a similar result.
6. Compose a Good Landscape Photo
A well-composed landscape photo arranges visual elements, like trees, clouds, mountains or people, so that they catch the eye, tell a story or evoke a certain emotion. Here are a few ways to improve the composition of your landscape photos:
Use the Rule of Thirds
Using the rule of thirds is an easy way to create a balanced and visually interesting picture. To do so, you simply break up your image into thirds vertically and horizontally with imaginary gridlines and position the subject(s) of your photo either along the lines or at the intersection of two lines. Many cameras allow you to display an actual grid in the viewfinder and/or on the LCD screen to help you compose images using the rule of thirds.

For example, instead of taking a photo of sunrise so that the horizon cuts across the middle of the picture, adjust your framing so the horizon is at the bottom third or top third. And try positioning the brightest or most colourful spot off to the right third or left third.
Make Use of Leading Lines
Using lines in your pictures is a powerful way to draw the viewer’s attention to the main subject and create a sense of movement through the image. For example, when you’re taking a landscape picture, think about how you can use things like trees, trails, clouds or cliff lines to guide the viewer’s eye through the image.

Change Your Point of View
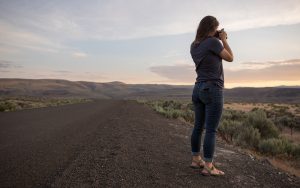
Shooting all your pictures from the same point of view can sometimes make your photos all start to feel the same. Try changing things up to add a new touch to your photos by kneeling or lying down on the ground, or find a way to get up high (can you hike up a nearby hill or safely climb a tree?).

7. Preparation Tips for Taking Great Landscape Photos

Know Your Camera
Whether you’re using a point-and-shoot camera, a smartphone or a DSLR, you need to know how to use your equipment before you get out there. Spend some time at home exploring the functions on your camera. Know how to adjust things like shutter speed, aperture and ISO.
Use the Landscape Auto Scene
If your camera doesn’t allow you to adjust shutter speed, aperture and ISO, look for a pre-programmed landscape scene and use that. This auto setting will adjust the shutter speed and aperture appropriately and optimise to the camera to capture the vivid colours in your shot. Learn more about how cameras work.
Research the Location
If you’re heading somewhere you’ve never been before, hop online before you leave home and do some research. Look for information about good viewpoints and beautiful areas of interest. You can even try using Google Street View to get a preview of what the scenery looks like. With this information, you can begin to dream up what your perfect landscape photo will look like and think about what you need to do to get the shot.
Scout Your Location
To get a really great shot, you’ll want to spend time scouting out your location ahead of time. If you’re able to explore the area several times in different lighting conditions, you’ll get a really good idea of where and when you need to be there in order to nail the shot. But, sometimes you’ll already be out on the trail when you decide you want to snap a landscape photo. In this case, still try to get in position with enough time to come up with a plan for capturing the scene. This can mean hiking up to a ridge or getting to an alpine lake an hour before the golden hour. You’ll use this extra time to determine exactly where you need to set up, what camera settings to use and what you want to include in the photo, like trees, rocks and people.


 Collecting and Propagating Seeds
 China on a Plate: The Flavours of a Nation (with a Spotlight on Sichuan)
 Kinesiology Cross Patches
 Camaraderie On a Walking Tour…
 How E-Biking Has Transformed Biking Tours


